How to add OAuth authorization for custom GPTs
Learn how to prepare an API, set up OAuth, choose the authorization flow and configure a custom GPT.


GPT market has been around for almost a month already and new GPTs are published every day. However most of the GPTs don't use APIs, and most of the ones that do are not properly restricted.
Setting up OAuth authentication allows you to take control over how your API is used inside the GPT, as well as makes sure you are able to monetize and track your user actions.
I have been looking forward to an opportunity to set up OAuth for a few months now, so I am happy to be here. At the moment I am working on a nutrition application which provides me with a good dataset for food and nutrition information. The app is built on Laravel, and gives me a good opportunity to explore how to integrate Laravel API with a custom GPT using OAuth authorization.
In this article I will go through the process of preparing an API, setting up necessary OAuth packages and code, testing the API, and configuring a custom GPT to use our API and OAuth.
The end goal is to have a GPT that fully integrates with our API using OAuth. As a user, you would go to our GPT, and it would let you authorize through our website, and let you access the data that is available for you.
Using OAuth is a great way to make sure you have the control over what data is available to users in GPTs, as well as allowing you to introduce user tiers, paid subscriptions and keeping history of user actions.
If you are interested to read more about basic rules of GPT custom actions you can take a look in our previous article on how to use custom actions in your GPTs.
Otherwise, let's get started.
API endpoints and setup requirements
In this article I will not build the API logic itself, I have already done so. Your API could be built on any software, language or framework, the general principles discussed in this article will still apply.
If you have a Laravel application I suggest taking a look at Laravel Resources, as it will help you define your API structure and speed up preparing your API endpoints.
For the purpose of this article, we will take a look at only one API endpoint.
Route::middleware('auth:api')->get('/foods/search', function (Request $request) {
    $searchQuery = $request->query('query');
    return new FoodsCollection(Foods::search($searchQuery)->take(3)->get());
});
routes/api.php
Our endpoint lets us search the foods catalog, and returns 3 matching resources. Our resources are set up to return a collection of resources, which contain the food name, url and nutrition information. Here is a snippet from Foods resource class:
    public function toArray(Request $request): array
    {
        return [
            'id' => $this->id,
            'name' => $this->name,
            'url' => Url::create('/catalog/' . $this->slug),
            'nutrition' => new NutritionCollection($this->nutrition)
        ];
    }
app/Http/Resources/FoodsResource.php
There is a lot behind the scenes that makes this possible, like relations, database structure, etc... but the main idea is to use the resource classes to organize what data is returned. This will come in handy later on, when we need to make an OpenAPI specification.
Once you have your API endpoints, you are ready to move on to implementing OAuth.
Choose the OAuth authorization flow
Before we start building it is important to figure out how our authorization will work. There are multiple flows for how OAuth can be implemented, and not all of them will fit our use case. The choice depends on what systems are involved, and will impact the user experience.
As our goal is to build a custom GPT with OAuth authorization, we know that access tokens will be owned by the user. Since our OAuth setup will be configured and stored in GPT configuration we can consider ChatGPT to be a server app.
Based on these 2 factors we will choose authorization code grant flow.
A great explanation on how to choose the right OAuth flow. The visual representation helps me choose:

In authorization grant flow we will have the following scenario:
- We will generate a client id and client secret to be used by our GPT. Our GPT is the client in this context. This client will have no user associated on the Laravel side.
- We will have an authorization endpoint which GPT will make a request to when prompted.
- The authorization endpoint will require the user to log in the Laravel app and approve the authorization. The authorization request will return an access code.
- The access code will be used to request an access token. We will have a token endpoint which will return the access token, refresh token, the expiration date for the tokens.
- The access token will be used to make the authorized requests on behalf of the user.
It takes some time to wrap your head around why each of the steps are needed, but in general this results in a robust authorization where we allow client integrations without exposing security flaws. No passwords need to be entered in 3rd party systems, nothing is stored where it should not. Read more about the OAuth security.
Scopes for Custom GPT
In addition, authorization grant flow also allows us to utilize scopes, which we can use to restrict certain endpoints or data to specific types of users. Since users will have accounts on the API app we can access their data and use them in our API resources.
In our GPT this is especially important as we are able to differentiate paid user tiers, and make sure that our data is used only in ways that we want it to.
Building the Authorization
The simplest way to build an OAuth authorization flow with Laravel is to use Laravel Passport.
Laravel Passport generates the needed routes, authorization logic, templates and database tables for storing access tokens, codes, etc... It gives you almost everything you need out of the box.
The documentation is fairly good to let you set up the base. Please follow the official documentation. Make sure to check the right Laravel version.
Laraval Passport Setup
In short there are only a few steps to install:
- Install composer package
- Run migrations to create the necessary oauth tables
- Generate passport keys by running php artisan passport:install
The keys will be stored in storage directory and should not be committed to version control. It is important to remember this so that when deploying to production you would remember to generate the keys.
You can also store the keys in .env, or publish the configuration file for passport, however it is not required unless you have specific requirements that need that.
Add HasApiTokens to user model
To ensure that your User model is connected with the passport authentication we need to add Laravel\Passport\HasApiTokens trait to your App\Models\User model.
<?php

namespace App\Models;

use Illuminate\Database\Eloquent\Factories\HasFactory;
use Illuminate\Foundation\Auth\User as Authenticatable;
use Illuminate\Notifications\Notifiable;
use Laravel\Passport\HasApiTokens;

class User extends Authenticatable
{
    use HasApiTokens, HasFactory, Notifiable;

    ...
}
app/Models/User.php
Configure authentication guard for API
'guards' => [
    ...
    'api' => [
        'driver' => 'passport',
        'provider' => 'users',
    ],
    ...
],
config/auth.php
This will instruct Laravel to use passport to guard api requests. It means that for any routes where you will use middleware auth:api the TokenGuard will be used to authenticate requests. If you remember from the very first snippet my API route does use the auth:api middleware like this:
Route::middleware('auth:api')->get('/foods/search', function (Request $request) {
    $searchQuery = $request->query('query');
    return new FoodsCollection(Foods::search($searchQuery)->take(3)->get());
});
routes/api.php
Modifying The Authorization Screen
During authorization GPT directs the user to our website to authorize the integration. It will show an authorization screen. By default the screen asking user to authenticate is unlikely to match your design.
In order to add your styling or modify the template you can publish it using this command:
php artisan vendor:publish --tag=passport-views
This will create a file - resources/views/vendor/passport/authorize.blade.php. You can make modifications to it like any other blade template.
Create an OAuth client to use for GPT configuration
Next we want to generate a client that we will use to configure the integration between our Laravel app and GPT.
php artisan passport:clientYou will be prompted to optionally enter a user id to associate the client with. Do not enter anything here because we want to make sure that the client is not tied to any specific user but instead access tokens are assigned to users after authorizing.
This command generate a client ID and client secret. Save these values as you will need them shortly in GPT configuration.
Testing our API
Debugging inside the GPT configuration tool is difficult, it might hide some responses or error codes. That is why I suggest you test the OAuth flow before configuring it in GPT. This will ensure that you don't waste time debugging why some GPT requests might be failing.
You can use software like Postman to test your API requests, or you can simply use curl requests to do the same. To not force postman on you, I will demonstrate how to test your requests using simple terminal commands.
Test Authorization Request
Authorization request will be the first request that GPT will make to initiate OAuth. You will need the following parameters to build it:
- Url - the url to make this request to is oauth/authorize. This route is auto-generated by Laravel Passport and should work out of the box.
- Client ID - this is a client identification generated by Passport when running the passport:client command. The client in this case will be our GPT.
- Redirect URI - this is a callback url that you configured when running passport:client. While testing this can be any url in your application. When we configure our GPT we will need to update it to match the callback url provided by GPT configuration tool.
- Response Type - this will instruct the response to return a code that we use in further requests. Set this to code.
- Scope - this parameter allows you to define the scope/s the application will have access to. It is ok to leave it empty while testing.
- State - the state parameter will be used to verify the state against the value that was stored prior to the redirect. It is a security feature. While testing it is ok, to set this to any value, just keep it consistent.
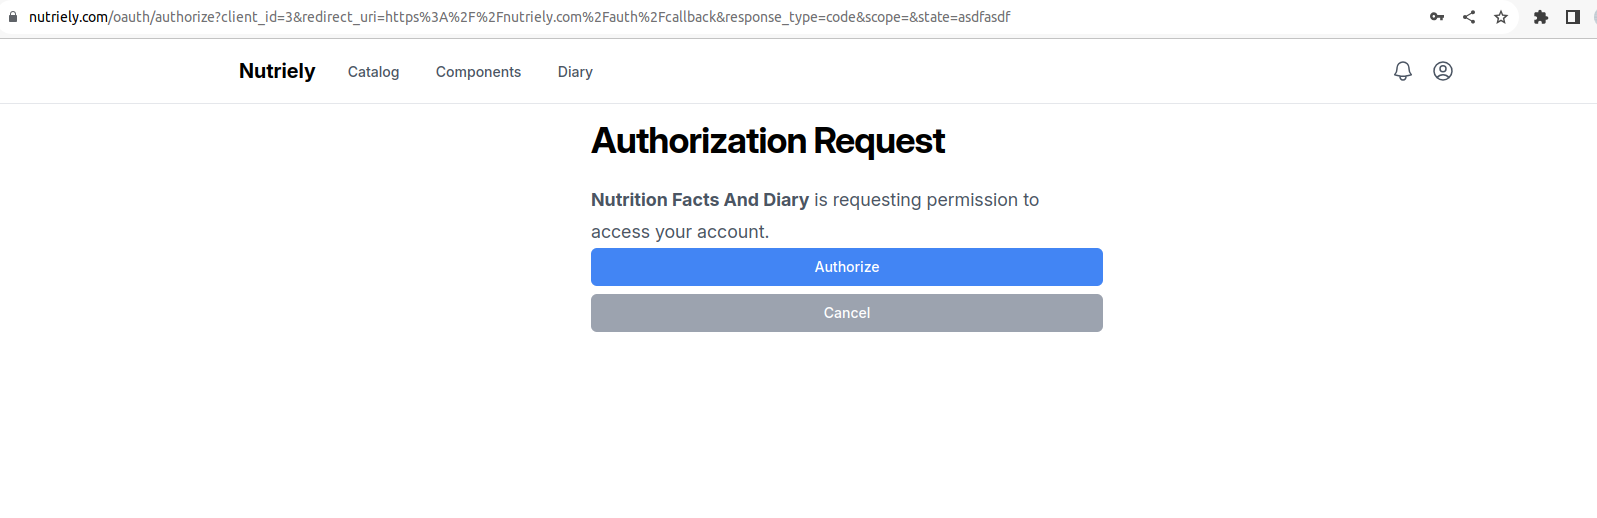
Put it all together and you will get a url like this:
https://nutriely.com/oauth/authorize?client_id=3&
redirect_uri=https://nutriely.com/auth/callback&
response_type=code&scope=&state=asdfasdf
This url will be built by GPT, and user will be directed to authorization page. First you would be prompted to log in, or if you are already logged in you will see the authorization page which asks you to authorize the client integration.
Once you click Authorize, you will be directed to the callback uri you defined in the initial request. In this case it would be this url:
https://nutriely.com/auth/callback?code=916b8...&state=asdfasdfAs you can see this url contains a code parameter which GPT will use to make further requests.
While testing simply copy/paste the code from the response url as you will need it in the next step.
Test Token Request
Once the user has authorized the request you can use the returned code to request an access token. You will need to make a request to the token endpoint, which by default in passport is /oauth/token.
We can simulate the token request by building the following curl:
- We can use POST method, as that is one of the methods supported by GPT. You could also use a header.
- Add a header to access application/json.
- Client ID - use the same client ID that was generated during passport:client command.
- Client Secret - use the secret that was generated during passport:client command.
- Redirect URI - make sure it matches the url that was entered during passport:client generation.
- Grant Type - we will use authorization_code, as that is the flow we have chosen
- Code - use the code that you got in the previous response after authorizing the client
- URL - make the request to oauth/token
Put it all together and the request will look something like this:
curl -X POST -H "Content-Type: application/json" -d
'{
  "grant_type": "authorization_code",
  "client_id": "33",
  "client_secret": "zIdQ8...",
  "redirect_uri": "https://nutriely.com/auth/callback",
  "code": "def5020..."
}' https://nutriely.com/oauth/token
If you prefer you can use postman or other software to make the same request.
In the response you will get the following:
{
  "token_type":"Bearer",
  "expires_in":2592000,
  "access_token":"eyJ0eX...",
  "refresh_token":"6fc50f654..."
}
You will use access_token to make authenticated requests to other API endpoints. Refresh token is used to refresh the access token when it expires.
Test API Request
Once we have the access token we can make a request to our previously defined api route. You need to add the authorization header and include the access token as a Bearer token. The request would look like this:
curl https://nutriely.com/api/foods/search?query=tofu
-H "Accept: application/json"
-H "Authorization: Bearer access_token_here"
In the response you should receive the resource as defined in your app.
Finally - Let's Configure Our GPT with OAuth
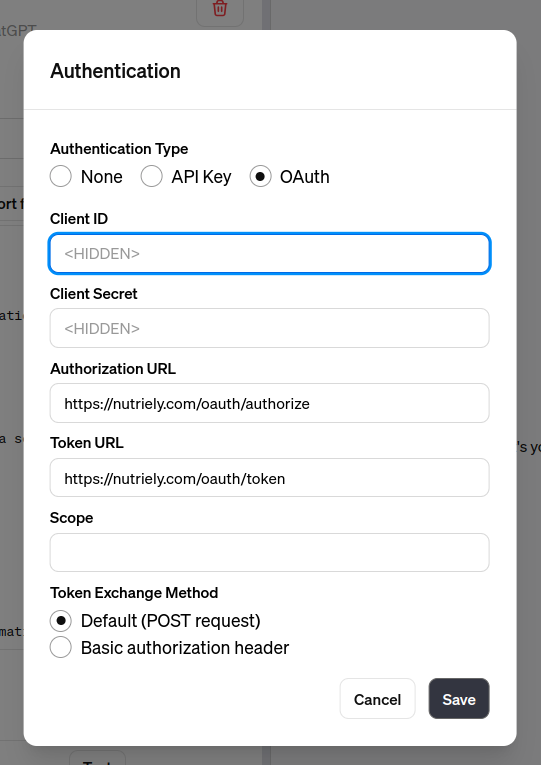
At this point we have tested our API, we know that it works with simple curl requests, and we have all of the needed credentials and URLs to configure the GPT. To sum up we will need the following:
- Title: The title of your GPT. It can be anything, not related to Oauth.
- Client ID: Generated by passport:client command.
- Client secret: Generated by passport:client command.
- Authorization Url: https://testapp.com/oauth/authorize (Auto-generated by Passport)
- Token url: https://testapp.com/oauth/token (Auto-generated by Passport)
- Scope: Optional
- Token exchange method: Default (Post Request)
Configure OAuth in GPT
You can start by selecting the Authentication for your GPT.
Choose OAuth and enter the credentials that we prepared in previous sections.
Tip for configuring Callback URL

Callback URL in GPT will be shown in the configuration only after adding an action. But you will need client id and client secret to configure it. So it is likely you don't have the correct callback url initially. While testing you can first generate the client with any callback. But when configuring the action in GPT you will need to make sure that this callback matches the one you have stored in database. You can update your client callback using this command:
update oauth_clients
set redirect = "https://chat.openai.com/aip/g-
21asfdasfdasfasfddsaf/oauth/callback" where id = 33;
If the callback urls won't match, then your credentials will be rejected and the GPT will not work. So it is important not to skip this.
Configuring Actions in GPT
Once you have configured the Authentication section, you can move on to define your actions. You will need a valid OpenAPI schema that will tell your GPT on what endpoints are available, what requests to make, what parameters to include and what to expect in responses.
You can generate the schema by using Swagger, or similar libraries. I found it quite simple to use GPT configurator for this. I can simply paste in the resources classes, my routes and ask ChatGPT to generate the OpenAPI schema for me. It did quite a good job of generating the template, I only needed to change the server url. Regardless of what tool you use, once you import a valid schema, you will see your endpoints in the Available actions section.

At this point we have the authentication and instructions for available actions. Our GPT should already be able to authenticate the user, and to use the actions with the authorized token.
A Video of Authorization
To demonstrate what we have built, here is a video showing how our GPT will use OAuth to request authorization from the user, and then get data from protected API routes.
Custom GPT OAuth Authorization Grant Flow
A few notes about the video:
- I am already logged in to nutriely.com website. For a new user it would ask to log in, or create an account.
- The video demonstrates the basic OAuth authorization grant flow. It is possible to customize every step.
- If you add user scopes then they would show in the authorization step.
- In case you decide to revoke access tokens, make sure to refresh the actions on your GPT, otherwise the user might be stuck, unable to authenticate.
Conclusion
It takes a bit of work but it is fairly simple to set up an OAuth authorization grant flow to authenticate users in custom GPTs. If you are using Laravel or similar powerful frameworks most of the work is already done. The important part is understanding how the authorization grant flow works, and understanding how to test your API.
On GPT configuration side it seems to work well for simple use cases like this.
Limitation in Response size:
During testing the API requests in GPT I came up on an error.
The error encountered was a "ResponseTooLargeError," indicating that the data returned from the search was too large to be processed in a single response.
I worked around this by reducing the response size on the API side, and not allowing API to return huge chunks of data. It is a limitation by GPT, it can not read huge responses.